How to build a WordPress theme from scratch.
Do you want to build a WordPress theme from scratch using the minimum amount of files, but still keeping a modern look and feel that adapts to mobile and tablet devices? That was one of my first resolutions for this blog during the new year.
I should warn you this post is going to be technical, so if you are not interested in how to create a WordPress theme, you might want to skip it.
I had a general idea how WordPress works and I was using some pretty good themes, but I wanted to create a new one from zero to understand better the system and to have full control on my blog.
After reading some basic documentation online and some trial and error tests. I was able to come up with a theme that I really like! The objective of this post is to describe what I learned, in case you want to do something similar.
First let me outline the conditions I wanted to meet with my new theme:
- It should be as minimalist as possible. It should have the essential number of files in terms of php pages, JavaScript files and CSS stylesheets.
- The theme should render correctly in mobile and tablet devices. Full mobile responsiveness wouldn't be an objective, but the look and feel should be pleasant across different screen sizes.
- It should have a modern look. It should have nice typefaces, borders, and shadows.
- As part of the minimalist approach the theme should use content delivery networks (CDNs) as much as possible to load external libraries and styles. Only the actual theme files should be stored in its folder.
- The theme should support the load a dynamic menu on the top and the loading of a dynamic sidebar. This consideration was important in my blog because I'm using both.
The following picture summarizes the layout distribution I wanted to use in my new theme:
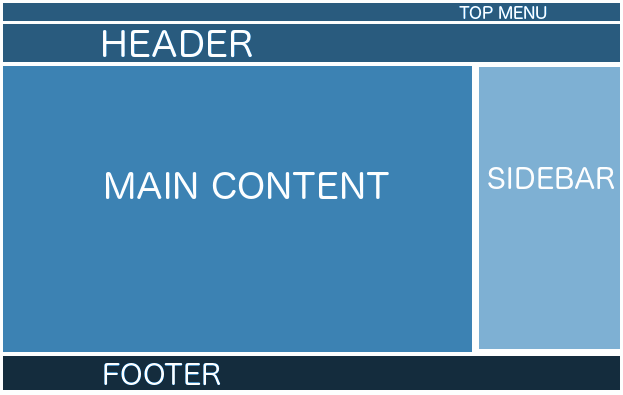
This graph will be translated in the following HTML markup:
Final result
You are looking a the final result right now (the theme is running in breaksian.com). I created a new
breaksianbasicfolder in mywp-content/themesdirectory. My theme contains on a single folder:../wp-content/themes/breaksianbasic/1 CSS stylesheet:
- style.css
1 functions file:
- functions.php
3 template files for the header, footer and sidebar
- header.php
- footer.php
- sidebar.php
1 template part file
- content.php
5 template files
- 404.php
- archive.php
- index.php
- search.php
- single.php
I will describe next the steps I followed to understand how the template system works in WordPress and what essential files I need to achieve this final result, but if you are impatient and want to get an executive summary then jump to the step 6 "Putting it all together".
Step 1: Understanding the template hierarchy
As I described before I wanted to create the new theme using the minimum amount of files. In order to achieve this objective it was important to understand how the template hierarchy works in WordPress and decide what were the essential files required for my theme.
The WordPress engine produces the different sections of the blog by binding together the content from different template files. If the specific template file is not available for that area or section, then the system tries to go one level up in the template hierarchy until it finds a matching template. This process repeats all the way up to the template file
index.php.Let me illustrate this with a concrete example. In my blog I have different categories for the countries I'm visiting. If a visitor goes to my Japan category (http://blog.breaksian.com/category/japan/). WordPress will look for a template in the following order:
category-japan.php -> Japan as the category slug. category-22.php -> 22 as id of the category Japan. category.php -> Categories general template. archive.php -> Archive pages general template. index.php -> As last resort, blog general template
I decided I could live with the same template for the archive and the categories pages, so I just included a
archive.phpfile in my theme. I repeated the same thinking process across my different blog section and I decided to create only the following five template files:404.php -> Custom 404 not found page with search functionality. archive.php -> Archive pages, categories, tags and authors. index.php -> Home page and the static pages. search.php -> Search results page template. single.php -> Single posts templateI also included some additional files for the header and the footer that I will explain below. If you want to better understand the template hierarchy structure, the following graph from the official Worpress codex documentation, summarizes it quite well:
Step 2: Understanding the
get_header, get_footer and get_sidebarfunctions.In most of the websites the header, the footer and the sidebar are relatively static. Those elements give consistency to the look and feel across the different pages and that was the case in the theme I was creating.
I could add the whole HTML markup to open and close the html document in each one of the files described in the previous section, but it would make more sense to automate the header, footer and sidebar generation.
Fortunately WordPress includes functions to automatically load those sections whenever you deem necessary:
get_header() => Loads the contents of header.php get_footer() => Loads the contents of footer.php get_sidebar() => Loads the contents of sidebar.phpIt is as simple as that. You might want also to include
wp_head()in yourheader.phpfile to hook up the styles and javascript files andwp_footer()in yourfooter.phpfile to attach some additional javascript files. A simplified version of my header, footer and sidebar is next:
header.php<!doctype html> <html <?php language_attributes(); ?> <head> <meta charset="<?php bloginfo( 'charset' ); ?>"> <meta http-equiv="X-UA-Compatible" content="IE=edge,chrome=1"> <meta name="viewport" content="width=device-width, initial-scale=1"> <title><?php wp_title( '|', true, 'right' ); ?></title> <?php wp_head(); ?> </head> <body <?php body_class(); ?>> <div class="topmenu"> <?php wp_nav_menu( array( 'theme_location' => 'header-menu' ) ); ?> </div> <div class="maincontainer"> <header class="blog-header"> <h1><a href="<?php echo home_url(); ?>" class="blogname"><?php bloginfo('name'); ?></a> <span class="blogdescription"><?php bloginfo('description'); ?></span></h1> </header>
footer.php<div class="footerwrapper"> <footer class="blog-footer"> <p><?php bloginfo('name'); ?> - © <?php echo date('Y');?> </p> </footer> </div> </div><!-- closing of the main container --> <?php wp_footer(); ?>
sidebar.php<div class="sidebar">
<?php if ( function_exists('dynamic_sidebar') && dynamic_sidebar() ) : else : get_links_list(); endif; ?></div>
Step 3: Understanding the loop concept.
If you read any documentation about WordPress sooner or later you will stumble upon the loop concept. The idea is that the system pulls all the posts for a specified page (ie home, category, archive) and it formats all these matching posts according to the criteria described in the loop tags.
You can add to the template the following opening and closing tags of the posts loop:
Using the predefined template tags you can extract the link to the post (
the_permalink()), the title of the post (the_title()), the date and time when it was published (the_time()), the categories if it belongs to any (the_category()) and the actual content of the post (the_content()).Based on the previous loop concept and the supported tags it would be very easy to create a template file that goes over the posts list and prints out the main fields, including the content.
if (have_posts()) : while (have_posts()) : the_post(); ?> <article class="post"> <h2><a href="<?php the_permalink(); ?>"><?php the_title(); ?></a></h2> <div class="entrymetadata"> <span class="date"><?php the_time('F j, Y'); ?></span> | </div> <?php the_content(); ?> </article> <?php endwhile; else : echo '<p>No content found</p>'; endif;?>Step 4: Understanding the
get_template_partfunction.As described in the Step 2, WordPress allows loading the header and the footer automatically by using the
get_header()and theget_footer()functions, but the system offers additional functionality to reuse sections of templates shared across different pages using theget_template_partfunction.Getting a template part makes easy to reuse the most common parts of displaying a blog post: Printing the title, the publishing date, the categories and its actual content. For my theme I decided to create a template part file called "
content.php" and to put there the reusable "post" markup and WordPress tags.I included in my
content.phpfile, part of the code I described in the previous step
content.phpand then I include this content with the
get_template_partfunction:while (have_posts()) : the_post(); get_template_part( 'content', get_post_format() ); endwhile;else : echo '
No content found
'; endif;Step 5: Understanding the
functions.phpfile and registering stylesAccording to the official WordPress documentation the functions.php file behaves like a WordPress Plugin, adding features and functionality to a WordPress site.. This file can be really useful because you can use it to register the scripts and styles used by your theme.
In the case of the
breaksianbasictheme, I'm using it to:
- Register the main CSS stylesheet (
style.css), so it gets loaded in the standard WordPress header.- Include the external library "font awesome". This library has some nice type-fonts and some beautiful icons.
- Register the header menu and the sidebar to manage both dynamically from the theme customize editor.
My functions file looks like this:
function breaksianbasic_resources() {wp_enqueue_style('style', get_stylesheet_uri());
// Add Awesome Font wp_register_style( 'awesome-fonts', '//maxcdn.bootstrapcdn.com/font-awesome/4.2.0/css/font-awesome.min.css'); wp_enqueue_style( 'awesome-fonts' );
} add_action('wp_enqueue_scripts', 'breaksianbasic_resources');
function breaksianbasic_registermenu() { register_nav_menu('header-menu',__( 'Header Menu' )); } add_action( 'init', 'breaksianbasic_registermenu' );
function breaksianbasic_widgets_init() { register_sidebar( array( 'name' => __( 'Widget Area', 'breaksianbasic' ), 'id' => 'sidebar-1', 'description' => __( 'Add widgets here to appear in your sidebar.', 'breaksianbasic' ), 'before_widget' => '', 'before_title' => '
', 'after_title' => '
', ) ); } add_action( 'widgets_init', 'breaksianbasic_widgets_init' );
The next step is to describe how all the previous steps fit together.Step 6: Putting it all together.
In the previous steps I described the different functionalities WordPress offers to create a new theme. I learned about those and as I was reading and discovering new tips, I started to incorporate them in my own templates and structuring more the theme. Based on those steps I described before, I wanted to recap now how I put it all together:
- Mock the HTML template: I mocked an single HTML template with the look and feel I wanted to get for my blog. I added all the CSS rules to
styles.css- Setup functions.php: Created a
functions.phpfile and registered the previous styles.css file, plus dynamic top header menu and sidebar (as described in the step 5).- Header, footer and sidebar: I created the files I was going to use for header, the footer and the sidebar (as described in step 2):
header.php,footer.phpandsidebar.php. I extracted the header and footer from my HTML mock and I filled those files with code snippets similar to the ones mentioned in Step 2.- Main content template part: I created a
content.phpfile and I put inside the template part content I was going to use in most of the pages:
content.php
- Created the
index.phptemplate: I created the main index template including the header, the sidebar and the footer. I added the loop described on step 3 on the left side div and the sidebar on the right div. I reused the content.php created in the previous step:
index.php<?php get_header(); ?> <div class="leftdiv"> <?php if (have_posts()) :
while (have_posts()) : the_post(); get_template_part( 'content', get_post_format() ); endwhile;else : echo '<p>No content found</p>'; endif;
?> </div> <div class="rightdiv"> <?php get_sidebar() ?> </div> <?php get_footer(); ?>
- Created the
archive.phptemplate: I reused the main index template for the archive.php file, but added an additional field required for archive date or categories.... if (have_posts()) : ?> <header class="page-header"> <?php the_archive_title( '<h1 class="page-title">', '</h1>' ); the_archive_description( '<div class="taxonomy-description">', '</div>' ); ?> </header>< ...Created the single.phptemplate: I lso reused the main index template for the single.php template file, but in this case I added an additional field for including the comments.... else : echo 'No content found
'; endif; ?><div class="comments"> <?php comments_template(); ?> </div>...
Created the search.phptemplate: I reused the archive template file, but I changed the archive date or categories field for a "search query" field.... if (have_posts()) : ?> <header class="page-header"> <h1 class="page-title"><?php printf( __( 'Search Results for: %s', 'breaksianbasic' ), get_search_query() ); ?></h1> </header> ...Finally I uploaded all the files to the template directory, I selected the new theme, I customized it and I start using it in breaksian.com Step 7: Final touches and conclusion
I described in this post the general process I used to create a new WordPress theme from scratch. As always, I used tons of official a non-official documentation available online. I have been adding many small touches to my theme since I finished the first iteration.
For example, since I'm using the awesome font library, I created some Social buttons, reusing some of the icons provided in it.
<div class="brk-social-buttons"> <a href="https://plus.google.com/share?url=<?php the_permalink(); ?>"><i class="fa fa-google-plus brk-social brk-social-plus"></i></a> <a href="http://www.facebook.com/sharer/sharer.php?u=<?php the_permalink(); ?>"><i class="fa fa-facebook brk-social brk-social-facebook"></i></a> <a href="http://twitter.com/share?url=<?php the_permalink(); ?>"><i class="fa fa-twitter brk-social brk-social-twitter"></i></a> <a href="http://reddit.com/submit?url=<?php the_permalink(); ?>"><i class="fa fa-reddit brk-social brk-social-reddit"></i></a> </div>I hope my experience was useful to you. For me it was definitively very interesting to create a new wordpress theme from scratch!.

